
Drawing basketball illustrations can be an exciting way to combine artistic skills with sports enthusiasm. Whether you’re an experienced artist or a beginner, the technique behind creating a realistic basketball drawing involves mastering fundamental concepts like shape, shading, and texture. This article will provide a detailed, step-by-step approach to drawing a basketball, introduce tools needed for “drawing:cul23ybyzfm= basketball” and explore common mistakes to avoid.
Table of Contents
Why Focus on “drawing:cul23ybyzfm= basketball”?
Basketball has universal appeal. Its round shape, distinct textures, and unique features such as the seams and valve make it both challenging and fun to draw. The keyword “drawing:cul23ybyzfm= basketball” serves as a comprehensive representation of techniques and skills needed to craft this particular sports-related image. By focusing on the right methods, artists can capture the energy and dynamism of the sport in their artwork.
What Makes “drawing:cul23ybyzfm= basketball” Unique?
In art, focusing on sports illustrations like basketball brings its own set of challenges. A basketball’s spherical shape and symmetrical design require keen attention to proportion and balance. Additionally, the textures created by leather or rubber surfaces and the seams that form the recognizable basketball pattern demand precision and thoughtful shading.
The Basics of “drawing:cul23ybyzfm= basketball”

Understanding the Shape
The basketball’s spherical nature means that capturing its three-dimensional form is the first major hurdle. Start by drawing a simple circle to represent the main body of the ball. While this step might seem basic, it’s crucial to maintain the correct proportions throughout the process.
A common tip for artists practicing “drawing:cul23ybyzfm= basketball” is to keep the circle light and flexible, as it serves as a guide for refining details later. Depending on the angle or perspective, the basketball might appear as a perfect circle or take on a slightly oval shape when viewed from different angles.
Shading and Perspective in “drawing:cul23ybyzfm= basketball”
When drawing a basketball, perspective plays a huge role. A head-on view gives you a perfect circle, while a tilted angle may result in an oval. Understanding light and shading is equally important. Shadows and highlights will define the roundness and texture of the ball. To make the basketball look three-dimensional, consider where the light source is coming from. Shadows should be placed on the opposite side of the light source, and highlights should be subtle but effective.
Tools for “drawing:cul23ybyzfm= basketball”
The tools used in creating your basketball drawing can significantly affect the final outcome. Here’s a breakdown of essential materials:
Pencils
An HB pencil is a versatile tool to start with. It’s excellent for outlining and preliminary sketches. For shading, softer pencils like 2B or 4B can add depth and shadows, while harder pencils (like H) can be used for lighter lines and subtle textures.
Paper
Smooth, clean paper is perfect for pencil work. Sketchbooks with thicker pages are ideal since they can endure erasing and multiple layers of shading without tearing.
Erasers
Mistakes are part of the drawing process. A high-quality eraser is invaluable for making corrections without damaging the paper.
Optional Tools
For artists seeking to explore beyond traditional pencil drawing, pens, markers, or even charcoal can add a different texture to the basketball. Rulers might not be essential for the ball itself, but they can help if you wish to draw basketball courts or additional background elements.
Step-by-Step Guide to “drawing:cul23ybyzfm= basketball”
Now that you have your tools ready, it’s time to dive into the drawing process. Here’s a detailed, step-by-step approach to help you create a realistic basketball illustration:
Step 1: Lightly Sketch a Circle
Begin with a simple circle that will act as the base of the basketball. Don’t worry about perfection at this stage, as it can be refined later. Use light strokes to ensure flexibility.
Step 2: Adjust for Perspective
Consider the angle from which you’re viewing the basketball. If it’s straight on, the circle should remain perfectly round. If viewed from an angle, adjust the shape to form an oval, giving the ball a more dynamic perspective.
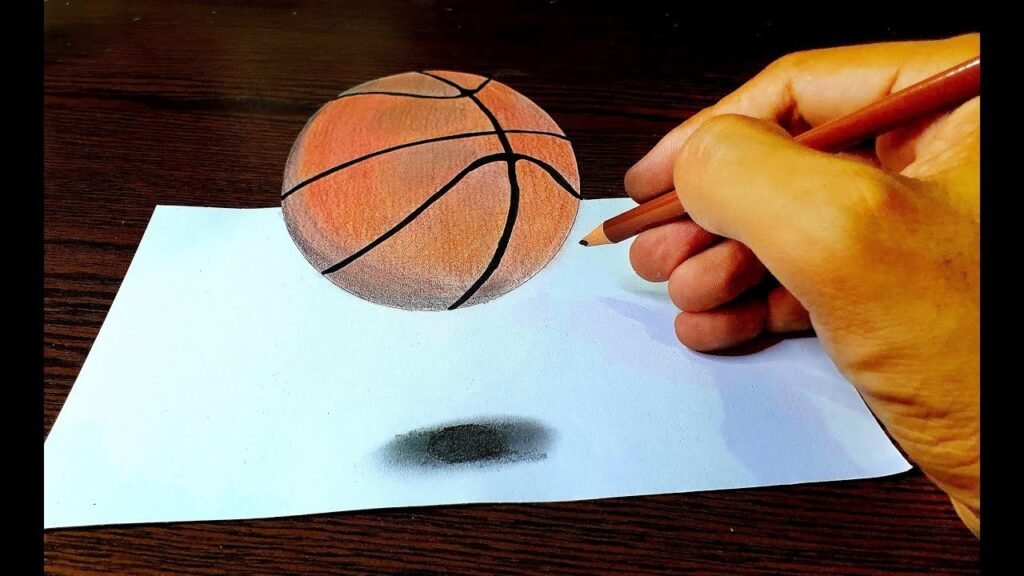
Step 3: Add Shadows and Highlights
To make the basketball look three-dimensional, add shadows to the lower or opposite side of the light source. Highlights should be placed where the light directly hits the ball, creating depth and volume.
Step 4: Include the Valve
Every basketball has a small valve used to inflate the ball. Draw this as a tiny oval near the top or side of the basketball, depending on the angle.
Step 5: Sketch the Seams
The characteristic seams on the basketball’s surface divide the ball into segments. Drawing them accurately is crucial for authenticity. Each seam should curve slightly to emphasize the ball’s round shape.
Step 6: Refine the Details
Once you’re satisfied with the shape, shading, and details, go over the lines again to make them more defined. The shading can be darkened for more contrast, and highlights can be adjusted to enhance the lighting effect.
Tips for Improving “drawing= basketball”
Basketball Drawing

To improve your basketball drawing, practice is key. Start by observing real basketballs or photos and paying attention to how light interacts with the spherical shape. Here are some additional tips:
Focus on Proportions
The seams, valve, and shading all depend on correct proportions. Always start light and gradually build on the design.
Practice Shading
Shading is one of the most important aspects of “drawing= basketball.” By practicing how shadows and highlights work together, you can make your drawing more realistic and dynamic.
Experiment with Different Tools
Don’t be afraid to experiment. Using colored pencils or charcoal can give your basketball drawing a unique texture and feel. Adding a background, like a court or net, will give your drawing more context and visual interest.
Common Mistakes in “drawing= basketball”
Even skilled artists can make mistakes when drawing basketballs. Here are some pitfalls to avoid:
Heavy-Handed Drawing
Using too much pressure when sketching can make it difficult to erase mistakes or refine lines. Start lightly, especially when outlining the circle or adding seams.
Ignoring the Sphere
Remember, a basketball is a three-dimensional object. Neglecting to consider this can result in a flat, unrealistic drawing. Always think about how light and perspective affect the shape.
Forgetting the Valve
It’s a small detail, but leaving out the valve can make the drawing seem incomplete. Make sure it’s included and positioned correctly.
Over-Shading
Too much shading can overwhelm the drawing and obscure the finer details. Balance is key when working with light and dark tones.
Expanding Your Skills in “drawing= basketball”
Once you’ve mastered the basics, consider expanding your basketball drawing skills. You can add a background, such as a court, hoop, or even players. Adding context to the drawing will make the artwork more engaging and dynamic. Here are some ideas for expanding your skills:
Draw the Entire Court
Challenge yourself by sketching the basketball within a larger context. This could include a detailed basketball court, complete with lines, hoops, and even players.
Experiment with Different Angles
Don’t just stick to a head-on view. Practice drawing the basketball from various perspectives, such as from above, below, or at an angle. This will give you a better understanding of perspective and shading.
Try Digital Drawing
If you’re looking to take your skills further, digital drawing software offers endless possibilities for enhancing your basketball illustrations. You can experiment with layers, textures, and lighting effects that are harder to achieve with traditional tools.
Conclusion: Mastering “drawing= basketball”
Mastering “drawing= basketball” is all about practice, patience, and attention to detail. By focusing on the fundamentals—shape, shading, and perspective—you can create realistic basketball illustrations that pop off the page. Remember to keep your lines light, use the right tools, and practice shading to add depth to your drawing.
Whether you’re an aspiring artist or a seasoned illustrator, the tips and steps provided in this guide will help you bring your basketball sketches to life. With the right techniques and a passion for the game, “drawing= basketball” can become a rewarding and enjoyable artistic endeavor.
